Introduction to Networking: Understanding the OSI Model (Simple Explanation for CCNA & CCNP)

Understanding the OSI Model


What is Data Encapsulation?

Before you understand the OSI model, you must first understand data encapsulation.

Let’s use a simple example.

Imagine you want to send a wedding invitation letter to your friend in another city. If you just write the letter and drop it into the mailbox without an envelope, address, or stamp — will it reach your friend?

Of course not.

The postal service needs extra information:

  • Sender name

  • Sender address

  • Recipient name

  • Recipient address

  • Postcode

  • Stamp

Without this information, the letter cannot be delivered.

This process of putting a letter inside an envelope with proper details is similar to data encapsulation in networking.


What is Data Encapsulation in Networking?

In computer networks, we cannot send raw data directly.

For example, when you send a Facebook message:

  1. You type the message.

  2. The browser sends it to the Operating System.

  3. The OS sends it to the Network Interface Card (NIC).

  4. The NIC sends it to the network.

At each step, extra information is added to your data. This extra information is called a header.

These headers include:

  • Source address (where it came from)

  • Destination address (where it is going)

  • Protocol type

  • Port numbers

  • Error-checking information

This process of adding extra information to data is called:

Encapsulation = Adding headers to data so it can travel across the network properly.

At the receiving side, the process is reversed. Headers are removed one by one. This is called de-encapsulation.


Why Do We Need the OSI Model?

In the early days of networking, different companies created their own networking systems. These systems did not follow common rules.

As a result:

  • Devices from different vendors could not communicate.

  • Troubleshooting was difficult.

  • There was no standard structure.

To solve this problem, engineers created a standard framework called the OSI Model.


What is the OSI Model?

OSI stands for Open Systems Interconnection.

It is a 7-layer model that explains how data moves from one device to another.

Each layer has a specific job.

The OSI model helps:

  • Standardize networking

  • Ensure devices from different vendors work together

  • Make troubleshooting easier

  • Explain how data is encapsulated step by step


The 7 Layers of the OSI Model

  1. Layer 7 – Application
    Handles user applications like web browsers, email, etc.

  2. Layer 6 – Presentation
    Handles data formatting, encryption, and compression.

  3. Layer 5 – Session
    Manages sessions between devices.

  4. Layer 4 – Transport
    Handles reliable communication (TCP/UDP).
    Data is called a segment here.

  5. Layer 3 – Network
    Handles IP addressing and routing.
    Data is called a packet here.

  6. Layer 2 – Data Link
    Handles MAC addresses and switching.
    Data is called a frame here.

  7. Layer 1 – Physical
    Sends bits over cables or wireless signals.

#OSIModel #CCNA #CCNP #NetworkingBasics #DataEncapsulation #TCPIP #NetworkEngineer #CiscoNetworking #Subnetting #ITStudents

How Encapsulation Works in the OSI Model

When data is sent:

Application Data
↓
Transport Layer adds TCP/UDP header → Segment
↓
Network Layer adds IP header → Packet
↓
Data Link Layer adds MAC header + trailer → Frame
↓
Physical Layer sends bits

At the destination, headers are removed in reverse order.


OSI Model vs TCP/IP Model

Even though we use the TCP/IP model in real networks, many engineers still refer to OSI layers.

For example:

  • “Is this a Layer 2 issue?”

  • “Do you need a Layer 3 port?”

  • “This is a Layer 7 protocol.”

The modern TCP/IP model has 5 layers, but it maps closely to the lower 4 layers of the OSI model.

For CCNA and CCNP students, understanding both models is very important.


Important Note for CCNA & CCNP Students

The CCNA exam does not deeply test the OSI model anymore. However, networking professionals still use OSI layer terminology daily.

If you want to:

  • Troubleshoot networks

  • Work as a network engineer

  • Pass CCNA or CCNP

  • Understand packet flow

You must clearly understand the OSI model.


#OSIModel
#CCNA
#CCNP
#NetworkingBasics
#DataEncapsulation
#TCPIP
#NetworkEngineer
#CiscoNetworking
#Subnetting
#ITStudents


BGP Routing Protocol Practice Lab 01


BGP Routing Protocol Practice Lab 01


Lab 1: MED and AS-Path Prepend


Basic configuration

R1:

interface Loopback0

ip address 1.1.1.1 255.255.255.255

!

interface FastEthernet0/0 
ip address 150.1.1.1 255.255.255.0
 no shut

!

interface Serial0/0

ip address 10.0.0.1 255.255.255.252

no shut

R2:

interface Loopback0

ip address 2.2.2.2 255.255.255.255

!

interface Loopback192

ip address 192.1.1.1 255.255.255.0

!

interface Loopback193

ip address 193.1.1.1 255.255.255.0

!

interface Loopback194

ip address 194.1.1.1 255.255.255.0

!

interface Loopback195

ip address 195.1.1.1 255.255.255.0

!

interface Serial0/0

ip address 10.0.0.2 255.255.255.252

no shut !

interface Serial0/1

ip address 10.0.0.9 255.255.255.252

no shut


R3:

interface Loopback0

ip address 3.3.3.3 255.255.255.255

!

interface FastEthernet0/0 ip address 150.3.3.3 255.255.255.0 no shut

!

interface Serial0/1

ip address 10.0.0.10 255.255.255.252

no shut !

interface Serial0/2

ip address 10.0.0.13 255.255.255.252

no shut !

interface Serial0/3

ip address 10.0.0.17 255.255.255.252

no shut


R4:


interface Loopback0

ip address 4.4.4.4 255.255.255.255

!

interface FastEthernet0/0 ip address 150.1.1.4 255.255.255.0 no shut

!

interface Serial0/0

ip address 10.0.0.14 255.255.255.252

no shut !

interface Serial0/1

ip address 10.0.0.18 255.255.255.252

no shut


Configure BGP as illustrated in the topology. Use the Loopback 0 addresses for peering. Do NOT configure any IGPs. Instead, use static routes only. R1 should peer with R2 and R4. R2 should peer with R1 and R3. R3 should peer with R2 and R4. R4 should peer with R1 and R3.


R1(config)#ip route 2.2.2.2 255.255.255.255 serial 0/0

R1(config)#ip route 4.4.4.4 255.255.255.255 fastethernet 0/0 150.1.1.4

R1(config)#router bgp 1

R1(config-router)#neighbor 2.2.2.2 remote-as 2

R1(config-router)#neighbor 2.2.2.2 update-source loopback 0

R1(config-router)#neighbor 2.2.2.2 ebgp-multihop 3

R1(config-router)#neighbor 4.4.4.4 remote-as 4

R1(config-router)#neighbor 4.4.4.4 update-source loopback 0

R1(config-router)#neighbor 4.4.4.4 ebgp-multihop 3


R2(config)#ip route 1.1.1.1 255.255.255.255 serial 0/0

R2(config)#ip route 3.3.3.3 255.255.255.255 serial 0/1

R2(config)#router bgp 2

R2(config-router)#neighbor 1.1.1.1 remote-as 1

R2(config-router)#neighbor 1.1.1.1 update-source loopback 0

R2(config-router)#neighbor 1.1.1.1 ebgp-multihop 3

R2(config-router)#neighbor 3.3.3.3 remote-as 3

R2(config-router)#neighbor 3.3.3.3 update-source loopback 0

R2(config-router)#neighbor 3.3.3.3 ebgp-multihop 3


R3(config)#ip route 2.2.2.2 255.255.255.255 serial 1/1

R3(config)#ip route 4.4.4.4 255.255.255.255 serial 1/2

R3(config)#ip route 4.4.4.4 255.255.255.255 serial 1/3

R3(config)#router bgp 3

R3(config-router)#neighbor 2.2.2.2 remote-as 2

R3(config-router)#neighbor 2.2.2.2 update-source loopback 0

R3(config-router)#neighbor 2.2.2.2 ebgp-multihop 3

R3(config-router)#neighbor 4.4.4.4 remote-as 4

R3(config-router)#neighbor 4.4.4.4 update-source loopback 0

R3(config-router)#neighbor 4.4.4.4 ebgp-multihop 3


R4(config)#ip route 1.1.1.1 255.255.255.255 fastethernet 0/0 150.1.1.1

R4(config)#ip route 3.3.3.3 255.255.255.255 serial 0/0

R4(config)#ip route 3.3.3.3 255.255.255.255 serial 0/1

R4(config)#router bgp 4

R4(config-router)#neighbor 1.1.1.1 remote-as 1

R4(config-router)#neighbor 1.1.1.1 update-source loopback 0

R4(config-router)#neighbor 1.1.1.1 ebgp-multihop 3

R4(config-router)#neighbor 3.3.3.3 remote-as 3

R4(config-router)#neighbor 3.3.3.3 update-source loopback 0

R4(config-router)#neighbor 3.3.3.3 ebgp-multihop 3


In order to ensure that the ORIGIN code is INCOMPLETE, you need to redistribute the LAN subnets into BGP. However, you can also use the network statement in conjunction with a route map and set the ORIGIN code within the route map.


R1(config)#route-map CONNECTED permit 10

R1(config-route-map)#match interface fastethernet 0/0

R1(config-route-map)#exit

R1(config)#route-map CONNECTED deny 20

R1(config-route-map)#exit

R1(config)#router bgp 1

R1(config-router)#redistribute connected route-map CONNECTED R1(config-router)#exit


You can verify the ORIGIN code by looking at the prefix entry in the BGP Tables. The ORIGIN code of INCOMPLETE is denoted by a question mark (?) in the output of the show ip bgp command. You can view additional detail on a per-prefix basis also when using this command


show ip bgp


show ip bgp


show ip bgp

show ip bgp


Configure BGP, so that R4 prefers the path via R3 to reach any subnet

In the output of the show ip bgp command on R4 we can see that the preferred route to reach 150.3.3.0 is via R3, however the preferred route to reach 150.2.2.0 is via R1 (the lowest routerid), also, to ensure that the subnet 150.1.1.0 will be reached via R3, configure BGP on R1 to advertise all prefixes with a longer AS-PATH to influence the path selection as follow:


R1(config)#route-map PREP permit 10

R1(config-route-map)#set as-path prepend 1 1 1 1 R1(config-route-map)#exit

R1(config)#router bgp 1

R1(config-router)#neighbor 4.4.4.4 route-map PREP out R1(config-router)#exit


Notice now the preferred path to reach both prefixes 150.3.3.0 and 150.2.2.0 is via R3 with the next-hop 3.3.3.3 because the shortest AS-PATH length:


do show ip bgp


Configure R4 so that it sends all updates to R3 with a MED of 4. Configure R2 so that it sends all updates to R3 with a MED of 2. Ensure that R3 prefers all routes with the better (lower) MED value.

Before configuring the MED let's verify the BGP RIBs on R3:

The preferred path to reach the prefix 150.1.1.0 is via R4, we should see all routes with the next-hop R2:


Let's configure MED


Let's configure MED on R3:

R4(config)#route-map MED permit 10

R4(config-route-map)#set metric 4

R4(config-route-map)#exit

R4(config)#router bgp 4

R4(config-router)#neighbor 3.3.3.3 route-map MED out

R4(config-router)#exit


R2(config)#route-map MED permit 10

R2(config-route-map)#set metric 2

R2(config-route-map)#exit

R2(config)#router bgp 2


R2(config-router)#neighbor 3.3.3.3 route-map MED out

R2(config-router)#exit


Let's verify the BGP RIBs of R3:

We have still the best path to reach 150.1.1.0 via R4 as shown by the show ip bgp command on R3 below, so the problem is not resolved even if R2 advertises the lowest MED comparing with R4.

The reason is: we met two issues in this case:

-the first issue is: by default, the MED is only compared for path received from the same AS ,in this case R3 receives two values of MED from two routers (R2 and R4) configured in different AS.

-The second issue: the MED is compared after the AS-PATH in the BGP decision process. In this case R3 will select the path via R4 as the best path to the 150.1.1.0/24 prefix because of the shorter AS-PATH length.


BGP MED


To override the two issues, configure the bgp always-compare-med command to avoid the first issue so always compare the MED even if MED is received from Different AS. And bgp bestpath as-path ignore command to avoid the second issue so that R3 override the BGP decision process by ignoring the step of the AS-PATH in the BGP Decision Process:

Let's configure these two commands:


R3(config)#router bgp 3

R3(config-router)#bgp bestpath as-path ignore R3(config-router)#bgp always-compare-med


We can see for the prefix 150.1.1.0 that the path with the longer AS-PATH length is preferred because the lowest MED even if the AS-PATH takes precedence over the MED in the order of the path selection in BGP:


BGP


Another way to verify all BGP RIBs with do show ip bgp, R3 prefers all routes from R2 because the lowest MED:


#BGP #LAB #CCNA #CCNP #CCIE #cisco #gns3 #solution


Deep learning will be faster and data collection better

Deep learning will be faster and data collection better


Nowadays, deep learning faces certain challenges associated with the data collection and the complexity of the computations. Innovations in hardware are now being developed to speed up the deep learning experiments, e.g. the new GPUs with a greater number of cores and a different form of architecture. According to Marc Edgar, a Senior Information Scientist at the GE Research, deep training will shorten the development time of software solutions from several months to several days within the next 3-5 years. This will improve the functional characteristics, increase productivity, and reduce product costs.
Currently, most large firms realize the importance of data collection and its influence on the business effectiveness. In the coming year, companies will start using even more data, and the success will depend on the ability to combine the disparate data. In 2018, companies will collect customer data via CRM, ticket systems, BMP and DMP, as well as the omnichannel platforms. The popularity of collecting data on specialized sensors like LIDAR is also on the rise. Integrating the existing systems with all types of client data into a single information pool will definitely be on trend. Startups will continue to create new methods for gathering and using data, further reducing the costs.
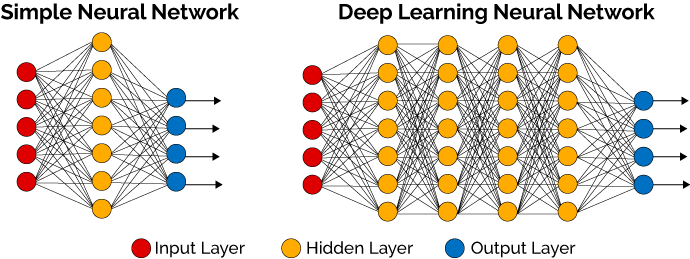
Image result for deep learning

Artificial Intelligence course by google free

Microsoft has just released an Artificial Intelligence learning track, open for everyone. Covers:
👶 Intro to AI
🐍 Python for Data Science
📈 Math and Statistics
👼 Ethics for AI
🤖 Deep Learning
More details here 


Featured Post

Day 41 — BGP Confederations: Sub-AS Design, External View and Migration

1. Opening Confederations are another way to scale BGP inside a large administrative domain. They divide the domain into member autonomous systems while presenting a single confederation identifier to external peers. They are powerful, but their operational model is more complex than simply 'using private ASNs inside.' The engineering goal is not to memorize another BGP command. It is to understand what information each speaker is allowed to propagate, what path information can be hidden, and what failure domain is created by the chosen control-plane architecture . 2. Concept and standards behavior RFC 5065 defines AS_CONFED_SEQUENCE and AS_CONFED_SET and how member-AS relationships are represented. Confederation external sessions have eBGP-like properties inside the confederation, while the confederation is presented externally as one AS. Modern guidance must also account for the fact that RFC 9774 prohibits new origination of AS_SET/AS_CONFED_SET in ordinary aggregation c...